Why is Bitbucket Pipelines slow? How to optimize bitbucket-pipelines.yml
Reasons why Bitbucket Pipelines is slow
Here are the top reasons why Bitbucket Pipelines is slow:
Poor performance of the underlying CI infrastructure. Bitbucket Pipelines can't guarantee the performance of its underlying infrastructure. From my personal experience using Bitbucket Pipelines daily for over seven years, delays in provisioning and build setup occasionally occur.
Recently, I started a separate project to monitor Bitbucket Pipelines performance (CIPerf). This project automatically pushes changes to a repository hourly, triggering the pipeline. The average time between a push and the execution of the first line in the "script" section is 25 seconds, with the lowest being 18 seconds. There are several worst cases, including 03:28, 01:16, and 00:59. This data proves that Bitbucket Pipelines can sometimes cause significant delays in build setups.
Additionally, I cannot optimize the hardware. I could use better hardware if I moved my CI out of Bitbucket.
Installation of numerous dependencies for each test run. To ensure my tests run without errors, I need to install libraries, tools, packages, database clients, third-party dependencies, preload test data into databases, etc. These installation procedures depend not only on the underlying hardware performance of Bitbucket Pipelines (which is poor) but also on internet bandwidth and the availability and performance of third-party services and repositories.
Example bitbucket-pipelines.yml explained
Here is an example of our bitbucket-pipelines.yml (the services section was removed for clarity). We use it to test our backend application written in Python at Design and Test Lab. The tests include unit and integration tests (PostgreSQL, Elasticsearch, and MinIO are involved).
image: python:3.11.7-slim-bullseye
pipelines:
  default:
      - step:
          script:
            - apt-get update
            - apt-get install -y build-essential
            - apt-get install -y postgresql postgresql-contrib
            - apt-get install -y postgresql-client
            - apt-get install -y curl
            - curl https://dl.min.io/client/mc/release/linux-amd64/mc --create-dirs -o $HOME/minio-binaries/mc
            - chmod +x $HOME/minio-binaries/mc
            - export PATH=$PATH:$HOME/minio-binaries/
            - mc alias set testing-minio http://localhost:9000 root root-pass
            - mc admin user svcacct add --access-key "test_access_key" --secret-key "test_secret_key" testing-minio root
            - mc mb testing-minio/dean-testing
            - PGPASSWORD=root psql -h localhost -p 5432 -U root postgres -c 'create database dean_unit_tests_db;'
            - pip install --ignore-installed -r requirements.txt
            - python -m pytest . --test_application_name=dean --junitxml=./test-reports/dean_out_report.xml
          services:
            - postgres
            - elasticsearch
            - minio
What's going on here?
Bash commands starting with apt-get are responsible for dependencies installation. In my case, this includes the PostgreSQL client. curl is used to download the MinIO client. pip install is used to install Python's third-party libraries. python -m pytest runs the tests themselves.
So among 14 commands, 13 are related to dependencies setup, and only one is for testing itself.
Here is the timing breakdown among all these steps:
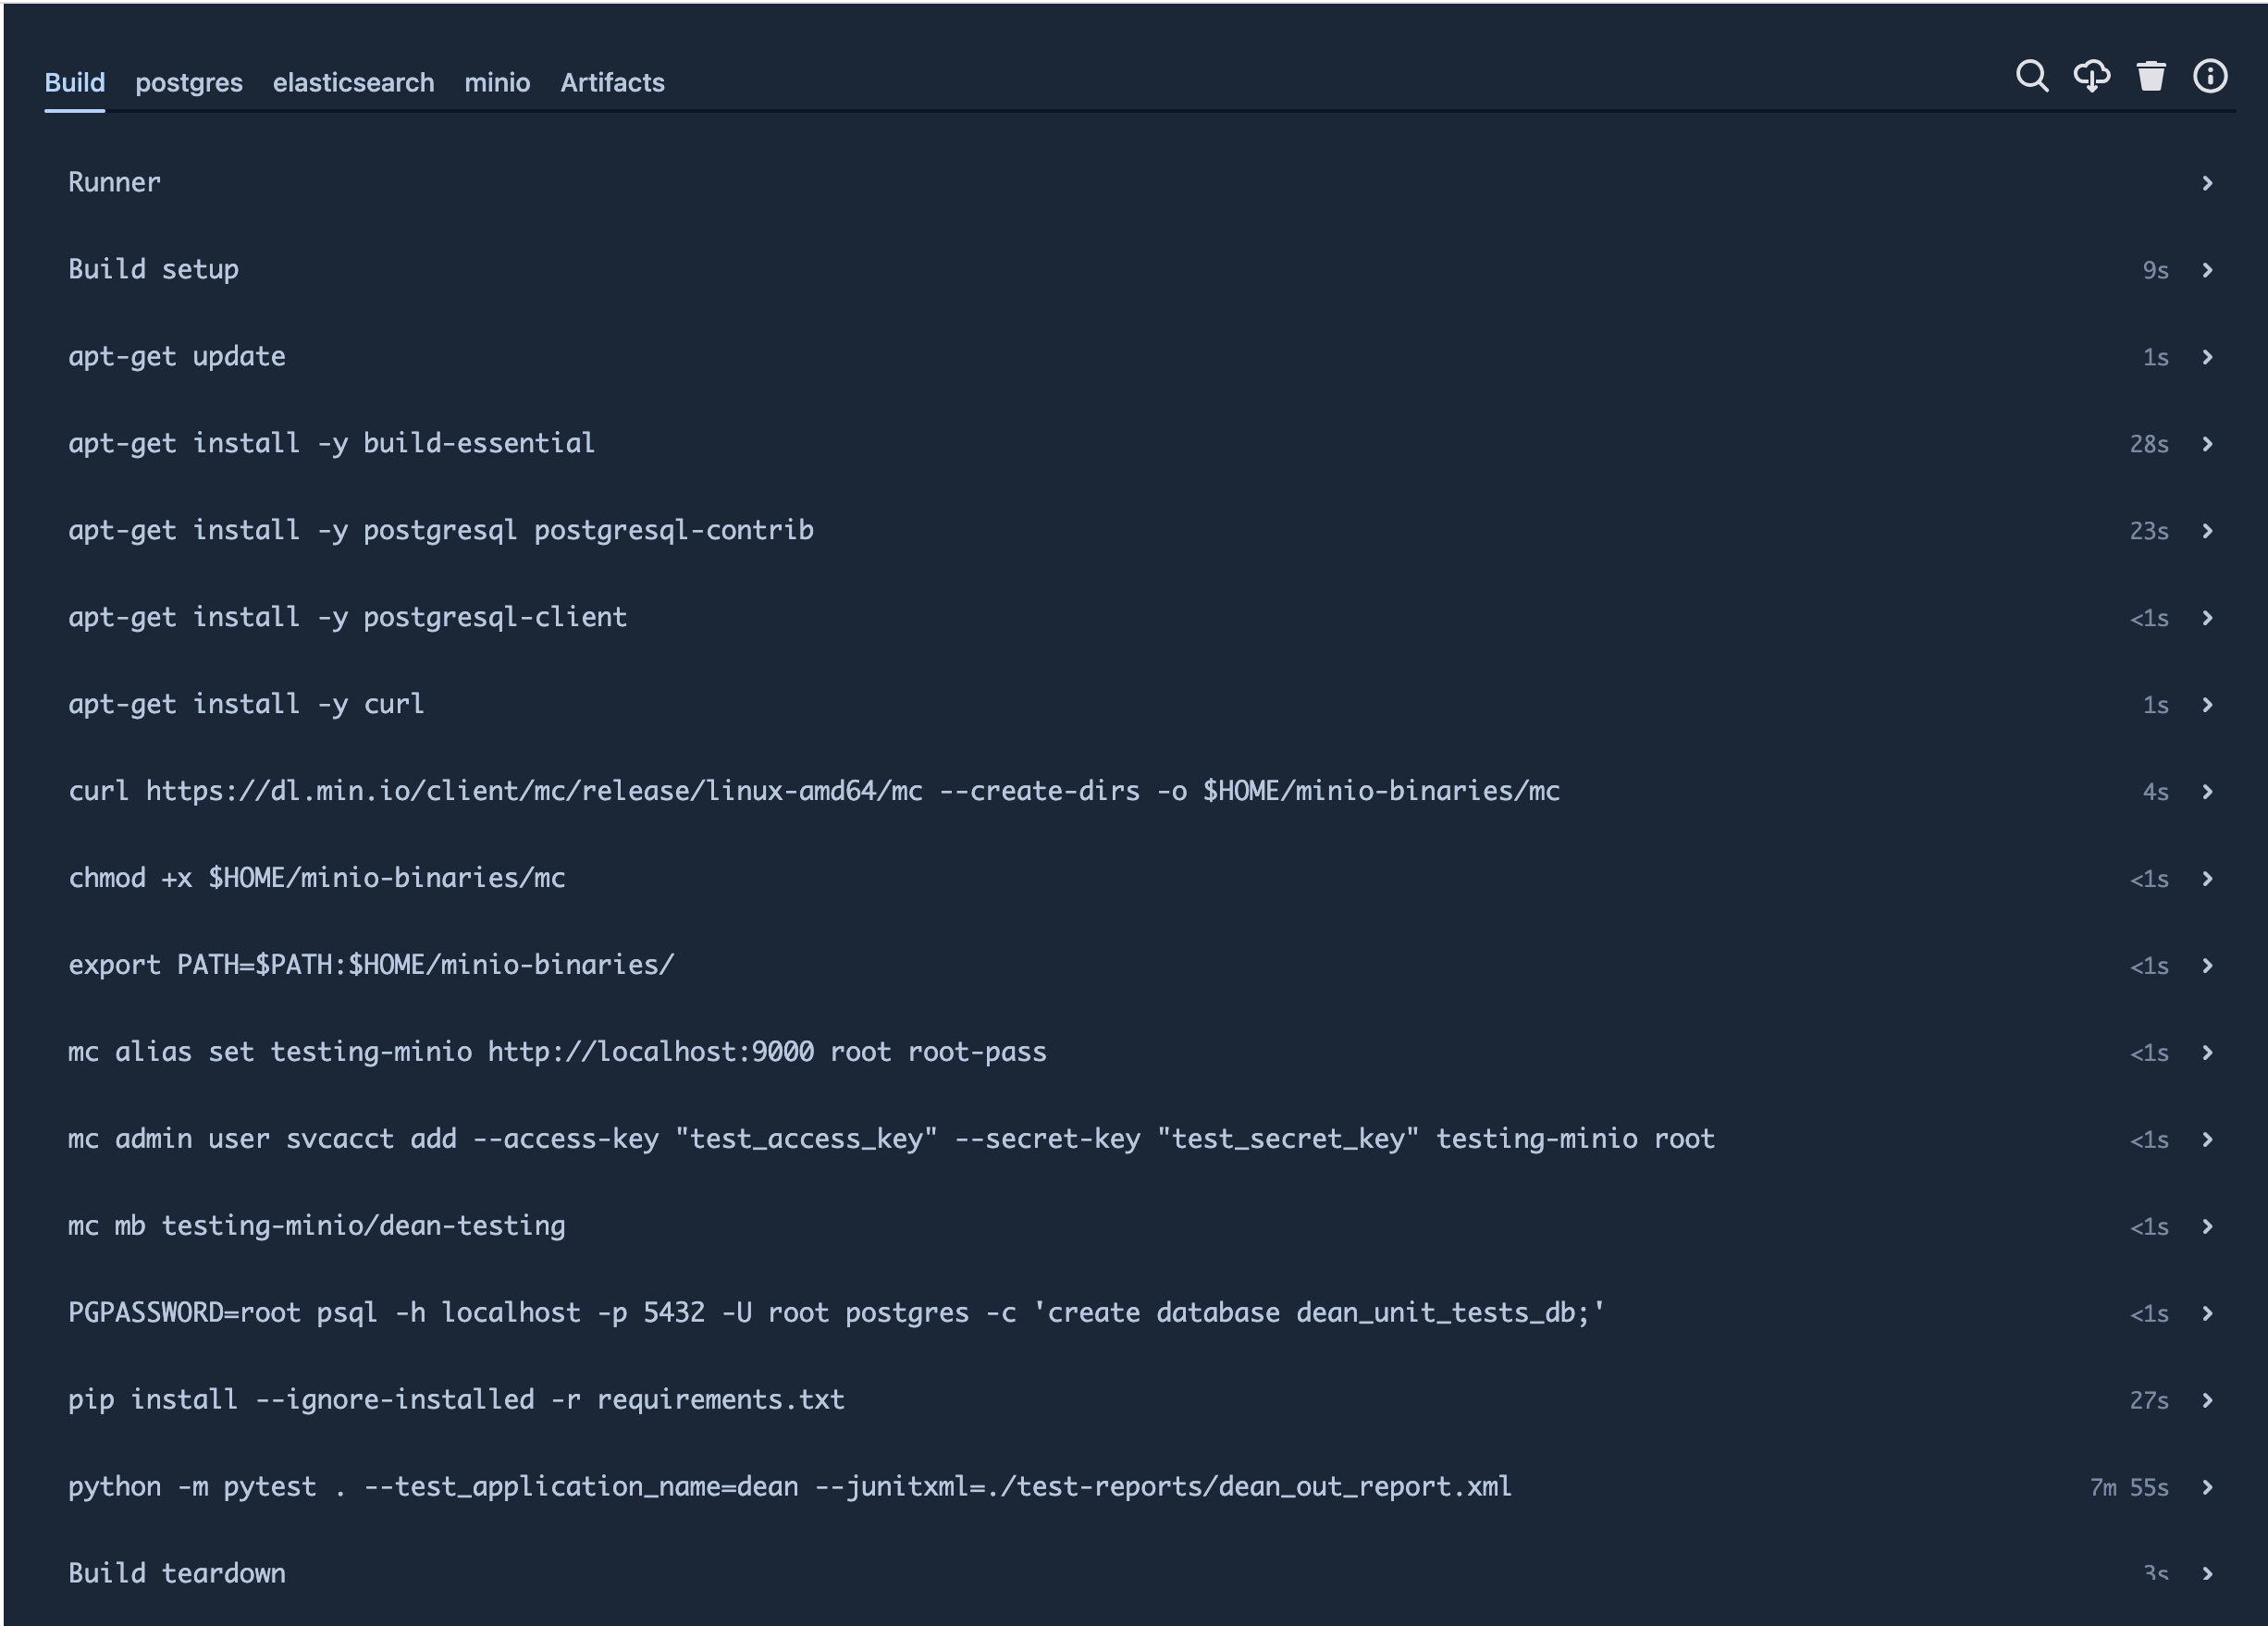
Dependencies installation and configuration take 1:31 (16%). Testing takes 7:55 (84%). The total dependencies installation and testing time is 9:26. More importantly, these apt-get install and curl commands are heavily dependent on internet bandwidth and the performance of the servers hosting the packages.
bitbucket-pipelines.yml optimization approach
These dependency installation commands change infrequently, so there is no need to run them every build. We can optimize this setup by doing it only once in a while and providing Bitbucket Pipelines with a pre-configured Docker image to start tests immediately.
Step 1. Move packages installation to a separate Dockerfile
I take the part of bitbucket-pipelines.yml related to dependency installation and slightly adjust it to match Dockerfile syntax. Important things to know:
FROMimage must be the same asimagein bitbucket-pipelines.yml.- Commands from script section must be preceded with
RUN. - Use
COPYif you need some files from your project. Hererequirements.txtis used bypipto install Python packages.
FROM python:3.11.7-slim-bullseye

RUN apt-get update
RUN apt-get install -y build-essential
RUN apt-get install -y postgresql postgresql-contrib
RUN apt-get install -y postgresql-client
RUN apt-get install -y curl
RUN curl https://dl.min.io/client/mc/release/linux-amd64/mc --create-dirs -o ~/minio-binaries/mc
RUN chmod +x ~/minio-binaries/mc
COPY requirements.txt .
RUN pip install --ignore-installed -r requirements.txt
I've created a file named Dockerfile-test-dependencies and put all these commands there to not be confused with Dockerfile which is usually used for the main backend application.
Step 2. Create a Docker repository
Bitbucket Pipelines must take your Docker image from some public or private repository.
- Go to Docker Hub, sign-up and sing-in.
- Go to Repositories/Create and create a repository for your image. You can create it under your personal or corporate namespace and make it public or private.
Important: make the private repository if your Docker image contains some secret or sensitive information. In my case I have only publicly available packages, so I've created the public repository.

Remember the pair of namespace and repository name — for me it is dntl/1l2c-backend-for-tests — you will need it at the next step.
Step 3. Build the Dockerfile and push to Docker Hub
To build Docker images you need to have Docker tools installed locally at your computer. Use the official guide: Install Docker Engine.
Building the Docker image is simple. Use this command line:
docker buildx build -f Dockerfile-test-dependencies -t dntl/1l2c-backend-for-tests:latest .
Explanation:
docker buildx build: This command uses Docker Buildx, an extended version ofdocker buildwith additional features. Buildx supports multi-platform builds, build caching, and more.-f Dockerfile-test-dependencies: Specifies the Dockerfile to use for the build process. In this case, the Dockerfile is namedDockerfile-test-dependencies.-t dntl/1l2c-backend-for-tests:latest: Tags the built image with the namedntl/1l2c-backend-for-testsand the taglatest. This tag makes it easier to reference the image later..: Indicates the build context, which is the current directory. Docker will look for the specified Dockerfile and any other files needed for the build in this directory.
Substitute dntl/1l2c-backend-for-tests with the repository name you chosen at the step #2.
If the build is OK, push the Docker image to the Docker Hub. Command line:
docker push dntl/1l2c-backend-for-tests:latest
Now you have all your test dependencies in a single Docker image available for use by Bitbucket Pipelines.
Step 4. Update bitbucket-pipelines.yml to use newly created base image
We need to change bitbucket-pipelines.yml in the following way:
- Put
dntl/1l2c-backend-for-tests:latestas forimage. Substitute it with name of your Docker repository. - Remove steps related to dependencies setup.
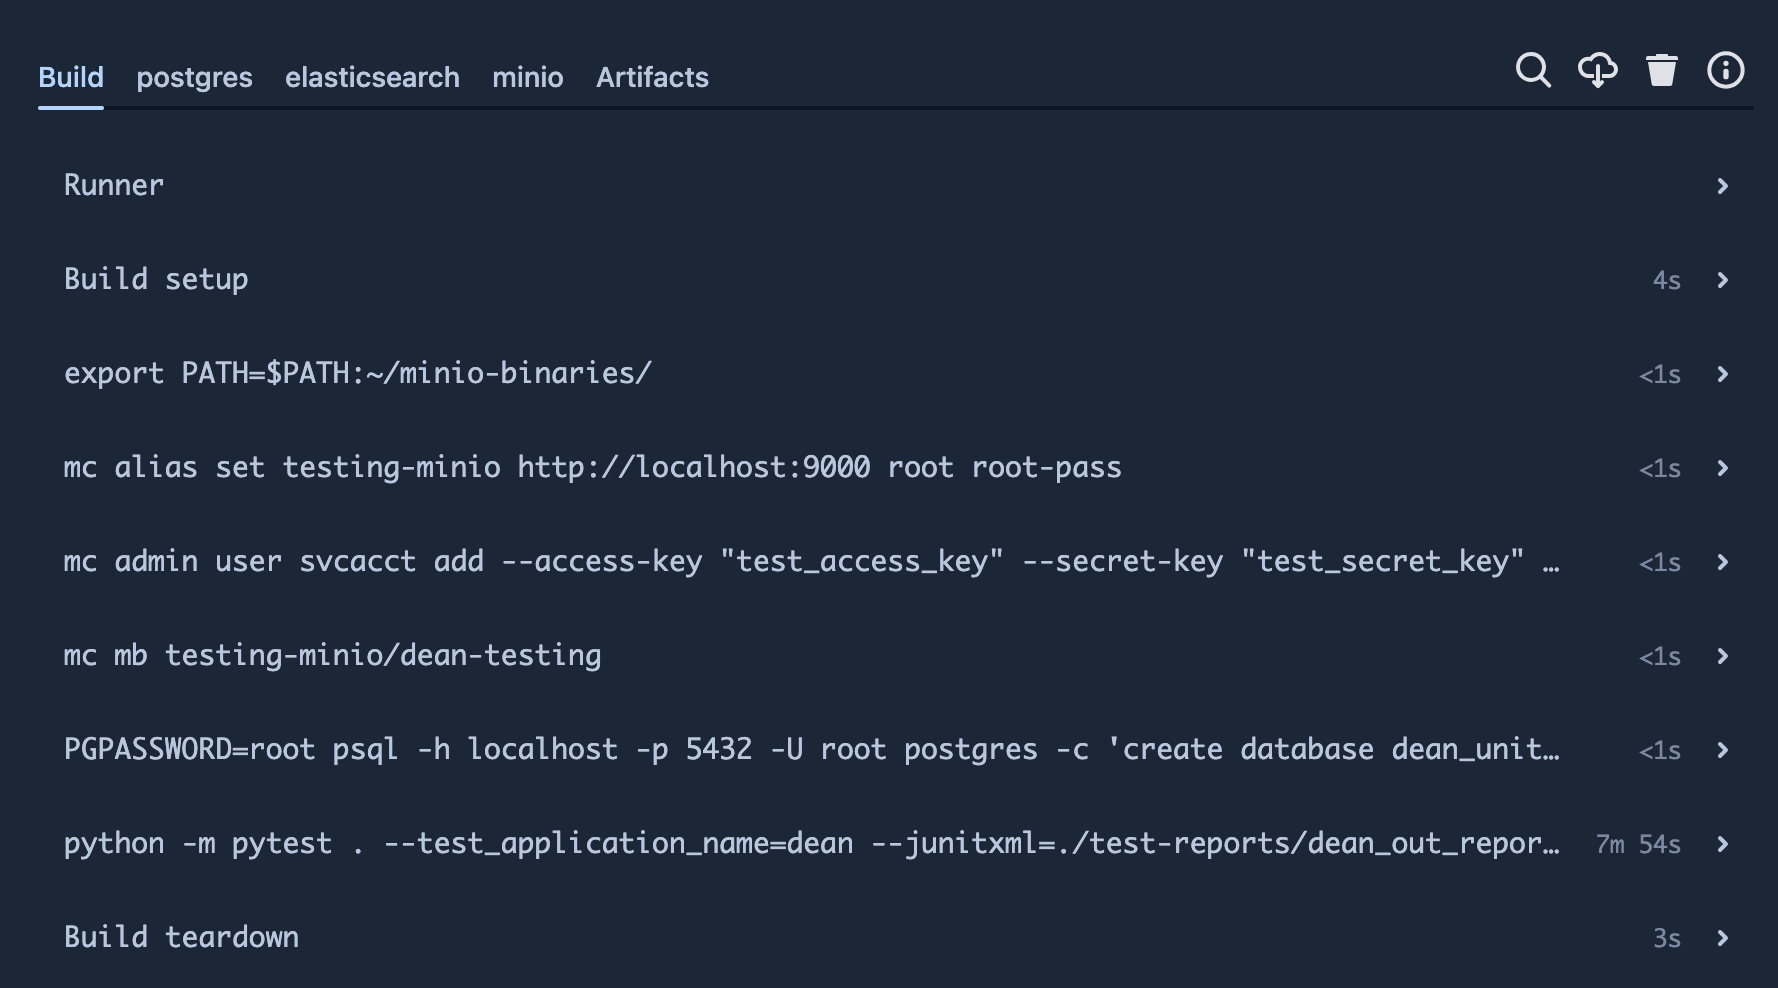
Here is my modified bitbucket-pipelines.yml:
image: dntl/1l2c-backend-for-tests:latest
pipelines:
  default:
      - step:
          script:
            - export PATH=$PATH:~/minio-binaries/
            - mc alias set testing-minio http://localhost:9000 root root-pass
            - mc admin user svcacct add --access-key "test_access_key" --secret-key "test_secret_key" testing-minio root
            - mc mb testing-minio/dean-testing
            - PGPASSWORD=root psql -h localhost -p 5432 -U root postgres -c 'create database dean_unit_tests_db;'
            - python -m pytest . --test_application_name=dean --junitxml=./test-reports/dean_out_report.xml
          services:
            - postgres
            - elasticsearch
            - minio
Commit and push these changes to the Bitbucket repository and check pipelines.
Optimization results
Here are the results of this optimization:
- Since the steps related to dependency setup are already done and stored in the base image, I no longer need to wait several minutes for them.
- Tests now start in less than 10 seconds (compared to 1:31 before optimization).
- Overall test execution time has decreased from 9:26 to 7:59.
- 2 Bitbucket build minutes are saved for each pipeline run.
Conclusions
Optimizing Bitbucket Pipelines by pre-configuring a Docker image for dependencies can significantly improve build performance and efficiency. This provides an answer to the question of why Bitbucket Pipelines is slow.
Key takeaways:
- Performance Bottlenecks: Bitbucket Pipelines can suffer from poor underlying CI infrastructure performance, leading to delays in provisioning and build setup.
- Dependency Overhead: Installing numerous dependencies for each test run can consume a substantial portion of the build time, heavily relying on internet bandwidth and third-party server performance.
Benefits of optimization:
- Reduced Setup Time: By pre-installing dependencies in a Docker image, you can drastically reduce the setup time required for each build.
- Faster Test Execution: With dependencies already set up, tests can start almost immediately, leading to quicker feedback and more efficient CI/CD cycles.
- Consistent Environment: Using a pre-configured Docker image ensures a consistent and reproducible environment for each build, reducing the risk of environment-related issues.
- Resource Efficiency: Offloading dependency installation to a Docker image minimizes the dependency on Bitbucket's infrastructure and internet bandwidth, making builds more reliable and faster.
- Saving Bitbucket build minutes: Optimizing the build process reduces the time spent on each build, saving valuable Bitbucket build minutes.
By implementing this approach, you can achieve a more streamlined and efficient CI process, allowing your development team to focus more on coding and less on waiting for builds to complete.